I don't know about you all but the days are just flying around here - I haven't had a minute to even create or post on my blog lately! Summer can be so challenging :) Anyway, here's a project that was shared a few days ago on the GCD blog - I hope you enjoy it :)
With Father's Day right around the corner it's likely that you are wracking your brain trying to figure out a gift for that special guy in your life. If you are anything like me, you're busy and sometimes finding the special gift gets accidentally pushed off until it's a bit too late.
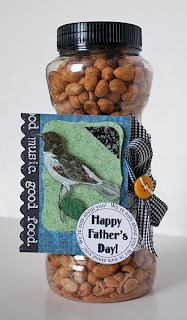
I created this project for all of my procrastination friends :) Here's a quick little "man" gift (equivalent to a man picking up flowers) that with just a few key supplies he'll think you had this planned for days :)
Supplies Needed:
~ jar of nuts - any kind
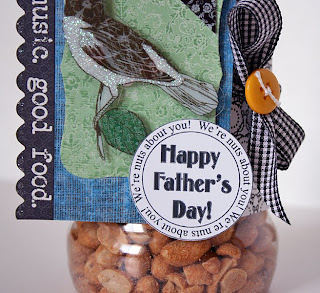
~ GCD Studios Papers and Embellishments (I used Artsy Urban - it has great colors that are perfect for men).
~ Adhesive
~ Trimmer
~ Scissors
~ Ribbon
~ Printed Digi Stamp (I am sharing the one I created here in this post - so grab it for free!)
Here's the completed altered Jar:
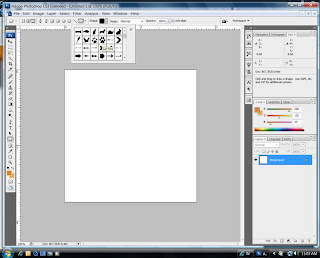
So have you been wondering how you could create your own digital stamps? Well I am going to show you how using Photoshop CS3. Here's how I created the one I used on this little altered can.
Step one: Open a new file in photoshop. Size it at about 2x2 inches.
Step two: In the tool bar on the left hand size click on the custom shapes button and then at the top of your page click on the "paths" (see arrow)

Step 3:
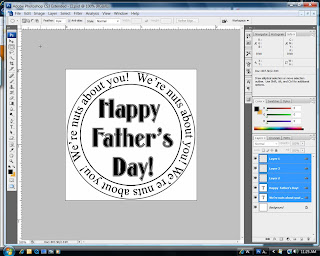
From the pull down menu select any shape you wish. Your stamp will take on this shape - so choose one that you like.
Step 4: (I selected a basic circle) now draw out the shape onto your workspace - it will look like this when you are done.

Step 5: On the left hand side toolbar select your text button and click on the outside of your drawn out shape and start typing.


 Step 6: You can adjust the size at the top using the basic sizing tools.
 Step 7: (optional): I formed another layer and typed in "Happy Father's Day" in the center. I also drew out a few other circles using the basic "stroke" function to add a bit more interest to my stamp - here's the completed stamp. Now all I have to do is print and punch it out using my spellbinders or hand punch.
Do you like this digital stamp? Click HERE to download it for free!
Happy creating!