Wednesday, April 30, 2008

A few altered items to share using Scrappin' Sports and More!!!

This month collectively as a design team for Scrappin’Sports & More (SSM) we took things “off the page” pulled out the mod podge and went to town altering!

I have always loved a good altering session and this month was all about that! What could be better! I have to say when it comes to altering you want paper that is easy to use …and SSM papers are the best when it comes to altering. If you don’t fall in love with the texture and weight of the paper the white core centers will for sure win you over! If you don’t believe me grab your nail file and watch your project come to life!

Okay…so what did I choose to alter?

Jackson is once again playing soccer and Chad is once again coaching him. This season Chad had a parent offer to help out! So he has an assistant coach. Armed with mod podge and one the awesome soccer lines by SSM here’s a little gift set that I came up with! (the card will fit inside the tin along with some goodies!)


So after finishing up that project I pulled out a clipboard that I have had sitting here for a while….

I made this clipboard with Scrappin’ Sports and More’s pre-school line! Oh and don’t think that those black dots around the edges are my own doodling either… (Shutter to think! ... you should know I don’t doodle!) These cute little dots can be found on the soccer rub-on sheet!


Ashlee is delighted to have such a fun clipboard just for her "crafts" Yep...she is already into "crafts" are you suprised? LOL...I have created a monster!

You will want to stop by the gallery to see what the other designers did this month…these ladies are TALENTED!

Sunday, April 27, 2008

Another new Gig...and goodbye to SeaScraps

So a few changes for me this month:

I am honored and thrilled to say that I have been chosen to be a part of the BBTB (Bitten by the Bug) design team! This is such an amazing group of crafters that are all hooked on the cricut "bug"...the inspiration each week is just amazing and I am very honored to play a small part in this. Thank you Regina for the honor! If you haven't check out the site yet...head on over and do so...you will be in awe of the eye candy!

This month I am also saying "goodbye" to Sandra's (SeaScraps) digital scrapbooking team. I can't believe that it has already been 6 months...time just seems to fly so quickly! I wish Sandra well in her endevors! She is an amazing and talented designer and I feel grateful for all that she has taught me. Now armed with some new knowledge, I plan on focusing more on my own digital creations...so be on the look out :)

I hope you all are having a wonderful Sunday!

Friday, April 25, 2008

Toot!

I received an email today from Paper Creations Magazine asking for one of my cards! I am just thrilled...! I hope to have more details soon as to which issue it will be appearing in!

Tuesday, April 22, 2008

Finally something to share :)

After my trip a few weeks ago I felt so inspired to get back and scrap and work on a few projects...but life is just insane lately...and I haven't had too much time to play.

Today I did get a birthday card done...and wanted to share it! I made this card with some papers from the Little Yellow Bicycle (Zach's Life). I was excited to find out that this was the kit at Scrapstreet this month! If you haven't check out the kits over there...you need to!

Here's my card:


I plan on using this card for my son's 9th birthday which isn't until the very end of June...so it looks like Mom is ahead of the game! Woohoo!

Thursday, April 17, 2008

Cricut Vinyl Tile plus instructions!

I have received a few questions on some older posts about where I get vinyl for my cricut and at what speed I cut it and how I transfer it evenly onto my projects.

So today I decided to make a tile for my kitchen and while doing it I thought I would go through a few steps on how I create my vinyls, cut them, and transfer them evenly.

Step 1: When designing a tile, wall art, or other vinyl project I always use cricut design studio. For me this software is essential…and I am slightly addicted to it. In design studio for this tile I selected a 12x24 size mat…I did this because today I am actually using some vinyl from Provo craft and it comes already cut in this size. Normally I would just select a 12x12 size mat and cut some “store” vinyl (as I get vinyl scraps from local sign stores in my area…most stores will sell you their scraps for next to nothing…and these work just as great as the Provo craft vinyl). I then simply played around with the various cartridges that I have in my growing collection…size it so that it fits just under the 12 inch mark on the sides and on the top…I do this to ensure that everything will cut properly.

Step 2: Load your vinyl onto your mat…plug your machine to your computer…and you are set to cut. Turn the speed dial down to low and your pressure dial down to low and cut away.

Step 3: If you cut a 12x24 I will then take the vinyl to my trimmer and trim off the extra 12 inches so that I don’t damage the remaining vinyl. I will then start the “weeding” process. Grab a sharp pin (the sewing kind) and some sharp scissors (like cutterbee). I will usually start by removing all of the “insides” such as the inside of and “e”. These are easy to remove with your pin by poking slightly and pulling up to remove the centers. After I have all of the centers out I will start to remove the rest of the extra vinyl around the letters…BE CAREFUL…it can tear…so go slow and take your time.


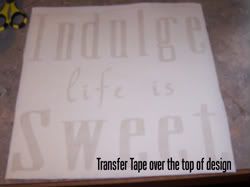
Step 4: After you have all of the excess vinyl off take some transfer tape (if you don’t have transfer tape you can use contact paper (just be careful when doing step 5…as it will leave a residue if you push it on too good). Place the transfer tape onto the top of your design so that the letters/design is completely covered.


Step 5: Turn over your vinyl with the transfer tape facing down (grid side up) and take a scraper…I am using my pampered chef scraper…you know the one that comes with the stone for cleaning…it’s perfect for this! And scrape the back…you will start to see a outline of the letters…basically you are transferring the letters to the sticky tape (think of it like reverse printing from your printer).


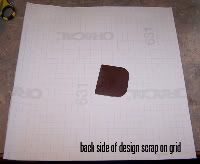
Step 6: Now peel back the grid side slowly…make sure that all letters/design is stuck to your transfer tape.

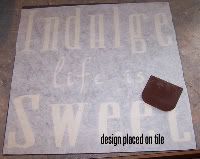
Step 7: Place your transfer tape with your design down onto your tile…be careful to get it lined up correctly…(once down it can’t come up or it may rip) and scrape lightly on top of the transfer tape to complete the transfer to your tile!


Woohoo you did it!


I saved this design (cut) and uploaded to media fire…click here if you would like to have it! (Note: I used Jasmine and stamped cartridges)

Tuesday, April 15, 2008

Cat out of the bag...my new "gig"

Ok...so I have been really bad at updating things...and today is the "official" launch for a new site called Page Plans! This is a sketch/inspiration blog site that is just going to be a really fun site to hang out! I was asked some time ago to help out and create some digital templates and sketches for the blog...and I am very honored to be a part of the team over there...so come check it out and watch page plans grow!

Saturday, April 12, 2008

Shopping Therapy! (the scrapbooking kind!)

Don't we all need some shopping therapy from time to time...the scrapbooking kind? Well that is what I have been up to this week on our family spring break vacation!

Some of my favorite things that I was able to pick up this week include a few new cricut cartridges and some vinyl! Throw in a few must have brand new releases from BG...and well I am itching to get home to scrap!

I feel so inspired by all of the awesome ideas that I have ran into this week...I think stepping away sometimes is so wonderful so you can go look and appreciate what other crafters are doing...add in your own twist...and the juices are really flowing!

Looking forward to catching up with all my buddies this week...I Hope you all had a great week!